Newcomers Guide to GitMate OSS
Everyone in the GitMate OpenSource community is expected to follow our Code of Conduct. We work together with coala and share similar standards.
Please carefully follow this guide to become a part of the GitMate developers team. We put a lot of work into preparing this for you!
The development setup specified, is a high level overview and is quite advanced for newcomers. So, lets take a deep dive into each of the steps.
Step 0. Meet our Community
To get started, the first step is to meet the community. We use mattermost. to communicate.
Before you join the community, there are a few things to be kept in mind.
- Do not @-mention users without a proper reason.
- Use public channels for all the discussions so that everyone can join hands.
- Never use @/all mention, unless it is something critical.
Join our mattermost workspace here. This puts you in ~general channel, where you can get started with our developer team. The newcomers should ping us “Hello World” to let us know they are here because we care!
~/dev/random is the second channel you wanna join :).
Step 1. Getting Started
Here are some references to get you started.
- Python for Beginners
- A Beginner's Python Tutorial
- Django for Beginners
- Writing your first Django app
- Getting started with Git
Step 2. Virtual Environments
In order to work with GitMate, you need Python installed. You can install Python from here. Recent versions of python ship with pip, the de facto python dependency manager. It is recommended that you work inside an isolated python virtual environment as it helps avoid dependency clashes.
A virtual environment can be created using tools like venv, virtualenv,
etc. It is recommended to use venv as it ships with latest versions of
python as a standard libary. Lets fire up a shell and create your own virtual
environment by the name gitmate-venv outside the project folder.
python3 -m venv gitmate-venv
From now on, when you want to work on the project, just activate the corresponding environment before you proceed further.
On Unix based systems, (macOS and Linux), this can be done with:
source gitmate-venv/bin/activate
And on Windows systems (without cygwin), this is done with:
gitmate-venv\scripts\activate
For Windows users
It is highly recommended that you switch to cygwin or git-bash for working with python projects. If you use Windows 10 or higher, please switch to Ubuntu on Bash on Windows for a seamless development experience.
Optional. Get Help with Git
We use GitLab to manage our repository. If you aren't familiar with git or GitLab, we recommend picking up a tutorial, such as this one.
coala has a page dedicated to git commands that will help you learn the basics. Although, it contains some coala specific stuff, it has a rock solid foundation on the usage of git.
Feel free to contact us on mattermost if you encounter any issues, we will help you!
Step 3. Forking the Repository
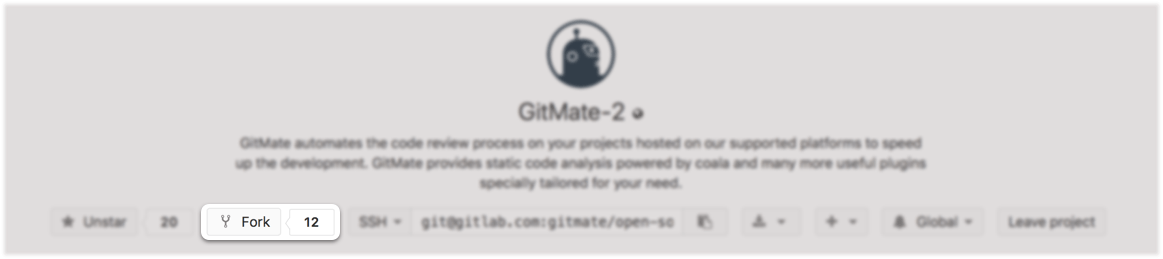
To fork the repository, go to the official repository of GitMate and click the Fork button. In a few moments, you should be redirected to a page showing the forked repository.
Now clone the upstream source repository, gitmate-2, with:
git clone https://gitlab.com/gitmate/open-source/gitmate-2.git
You now have a working copy of the code on your local machine. To maintain the remote link to your forked repository add it as a new remote after changing directory into it. Copy the clone link from your fork and add a remote to push changes later:
cd gitmate-2
git remote add myfork <your_fork_clone_link_goes_here>
Refer working with remotes here. This upstream remote will help you keep the code on your machine updated, whereas you can use your fork's remote to send in pull requests with new changes.
Step 4. Setting up a Workspace
Install required python dependencies with python3-pip:
pip install -r requirements.txt
Docker Configuration:
GitMate uses Docker containers to perform some tasks in response to GitHub and GitLab webhooks. So, make sure you have docker installed and running. Refer this guide on how to install Docker on your local machine.
You may need to pull in some docker images if you need to test plugins like code analysis, rebaser etc. To download the images from images, first login to GitLab's container registry with your GitLab username and password. If you have 2FA enabled you may need to use a personal access token:
docker login registry.gitlab.com
Then download the images, with:
docker pull registry.gitlab.com/gitmate/open-source/coala-incremental-results
docker pull registry.gitlab.com/gitmate/open-source/result-bouncer
docker pull registry.gitlab.com/gitmate/open-source/mr-rebaser
PostgreSQL Configuration:
GitMate uses PostgreSQL as a database store. Refer this guide on how to install PostgreSQL on your local machine.
Warning
GitMate uses PostgreSQL v9.6 only. Make sure you download the appropriate version before proceeding any further.
Check whether you have postgres service running.
pg_isready
If the response is something like /tmp:5432 - accepting connections, the
service is up and running. Otherwise, please start the server depending on the
your operating system.
- On Linux/Unix, run
$ systemctl start postgres - On macOS, run
$ brew services start postgres@9.6 - On Windows, run
❯ net start postgresql-9.6
Once you have postgres running, login to the default database postgres.
Then create a user with role CREATEDB by the name postgres with login
password postgres.
$ psql postgres
psql (9.6.5)
Type "help" for help.

postgres=# CREATE ROLE postgres WITH LOGIN PASSWORD 'postgres';
CREATE ROLE
postgres=# ALTER ROLE postgres CREATEDB;
ALTER ROLE
postgres=# \du

                    List of Roles
    Role name     |               Attributes                | Member of
------------------+-----------------------------------------+-----------
 postgres         | Create DB                               | {}
Note
We have followed the usernames and passwords with the conventional defaults used in GitMate, you can change them according to your liking with environment variables.
Creating OAuth Applications:
To enable login via GitHub and GitLab, we need to register an OAuth application and use it's keys.
Follow these guides for creating OAuth apps:
Here's a sample Github OAuth page.
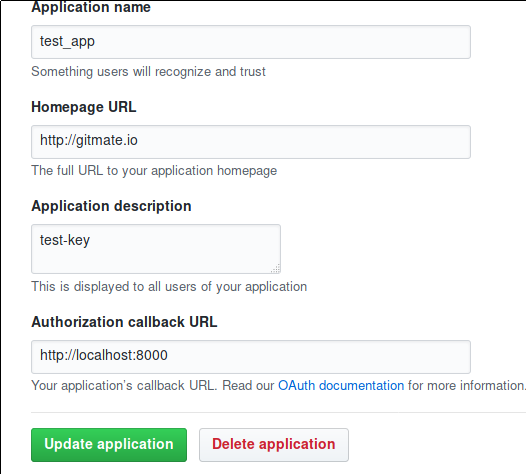
Configure the client identifiers and secret keys via the environment variables
SOCIAL_AUTH_GITHUB_KEY, SOCIAL_AUTH_GITHUB_SECRET, SOCIAL_AUTH_GITLAB_KEY,
and SOCIAL_AUTH_GITLAB_SECRET.
Step 5. Making Changes
Branching Gotchas (Proper Git Flow):
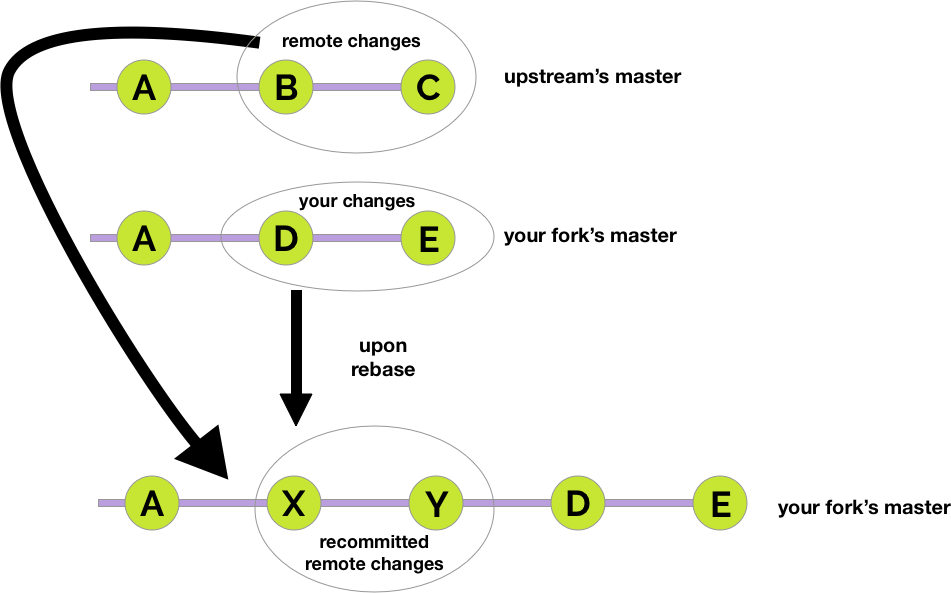
It is important that you DO NOT make changes on the master branch of your fork to avoid the following scenarios:
- If you try to rebase and synchronize your fork with the original repository, every commit pushed to the remote master will be pulled into your master branch. Making a pull request with such a branch will recommit the newly synced commits from upstream along with your changes.
- You cannot have two pull requests using the same branch name. Therefore, if your fork’s master has been used in a pull request and you decide to work on a different issue you will have to branch eventually.
In order to avoid the above mentioned issues, please create a new branch and start making changes to it. To create a new branch, run:
git checkout -b <branchname>
Creating new plugins and responders is documented here.
Now you need to make sure your change is actually working. For this, you will need to test it locally before pushing it to your fork and checking it with concrete examples. After that you should run coala on your code.
Install coala and analyze your code with:
pip install coala-bears
coala
Fix the errors and run coala multiple times until it reports no errors.
Step 6. Executing Tests
GitMate has a fairly large test suite with over a 100 testcases.
To run the tests, navigate to the root directory of the project and install the test dependencies with:
pip install -r test-requirements.txt
You can then execute the tests with:
py.test --doctest-modules
Recording external requests
The testcases might require you to record external requests with vcrpy, which inturn needs a couple of authentication tokens. Please contact us on mattermost to get the tokens.
Test Coverage:
To get coverage information, run:
py.test --cov --doctest-modules
You can view the coverage report as html by running:
py.test --cov --doctest-modules --cov-report html
The html report will be saved inside .htmlreport in the root of the cloned
repository.
Where to run tests?
All tests should be run in the root directory of the project. Failing to do so will break the tests and lead to unexpected results.
Step 7. Submitting Your Changes
Before you submit your code, you need to configure GitLab shared runners on your forked repository to ensure that the tests run properly. Make sure that you have turned on shared runners in your fork repository settings.
Grant Developer access to gitmate/open-source organization, so that you can share your CI pipeline logs from your merge request.
Open member settings from your fork of gitmate-2 repository following the image below.

Add gitmate/open-source organization as member and hit the Share button.

A word about tokens on CI tests
Since all the external requests are recorded with vcrpy, basically we can just run off the CI tests without a matching token. But you're gonna require those variables locally to record the requests first. So, if you need them, please contact us on mattermost.
Now that your CI is ready, you can continue and send in a Merge Request to the original gitmate-2 repository.